Edit Any 3D Model in Minutes: Direct Modeling Tools in PixyCAD
Your print came out 0.3mm too narrow. The mounting flange doesn’t quite clear the PCB. One wall needs to be thicker, or one boss just needs to go. The model is 90% done and you know exactly what has to change. In parametric CAD, “exactly what has to change” can still mean an hour of unwinding your feature tree, tracking down the original sketch, and hoping nothing downstream breaks. In direct modeling, you grab the face and move it.
That’s the core idea behind direct modeling: you work on the geometry itself, not on a history of operations. There’s no feature tree to manage. If a face is in the wrong place, you move it. If an edge is too sharp, you adjust the radius. You stay close to the actual shape and keep the iteration loop short.
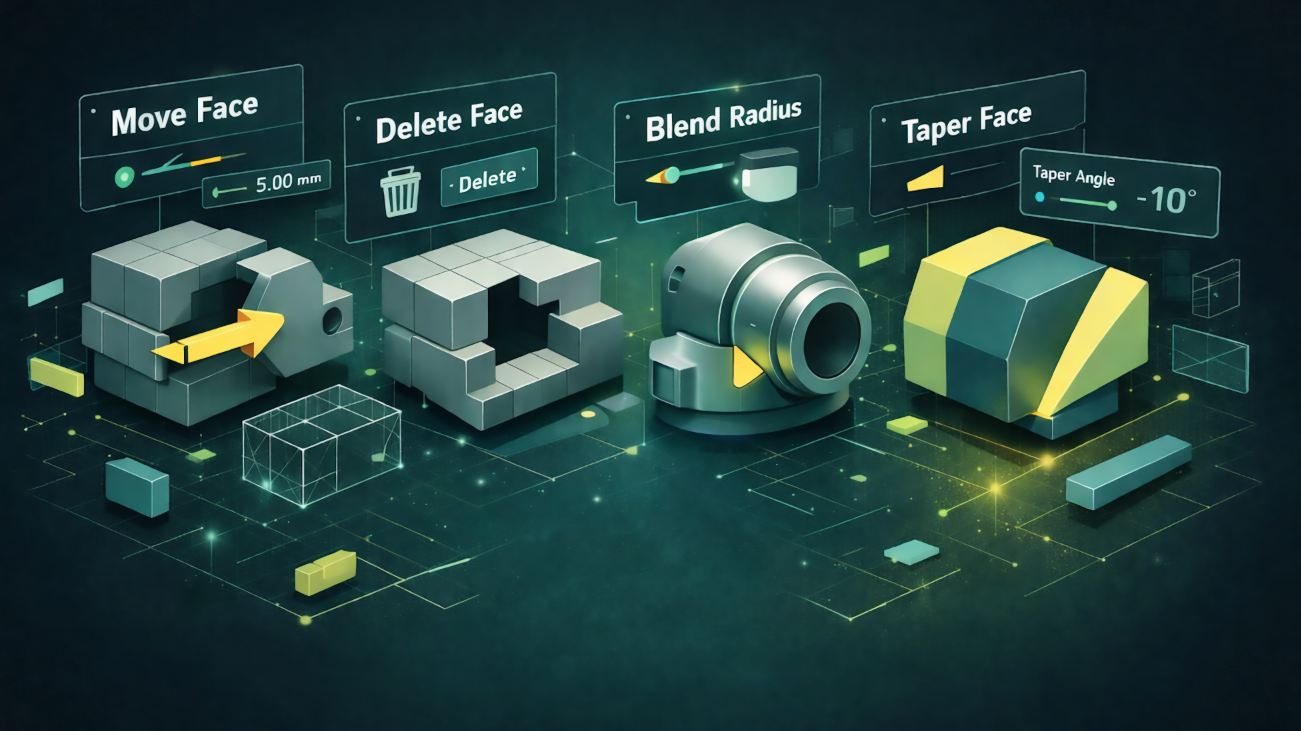
PixyCAD has four editing tools that makers reach for constantly: Move Face, Delete Face, Blend Radius editing, and Taper Face. This post covers what each one does and when you’ll want it.
Push It, Shift It, Get It Right: Moving Faces
Select a face, move it, and PixyCAD heals the surrounding geometry automatically. The adjacent walls stretch or compress to stay connected. Nothing opens up. Nothing needs patching. You just tell the model where you want that face to be, and the solid updates around it.
Move Face works just as well on imported geometry. If you’ve brought in a STEP file from a manufacturer or grabbed a model from somewhere online, there’s no feature history attached to it. Direct modeling doesn’t care. You’re working on the solid body directly, so the origin of the geometry doesn’t matter. You see a face, you move it.
Remove What You Don’t Need: Deleting Faces
Sometimes you don’t want to move something. You want it gone. Delete Face removes a face from the solid body and extends the adjacent geometry to close the model cleanly. The result is a valid, watertight solid. No holes, no open shells, nothing a slicer will choke on.
The use cases are straightforward. That embossed logo on an imported enclosure panel you want to reprint plain, the boss that was designed for a screw you’re not using anymore, the cutout you placed in the wrong spot before you measured twice: select the face, delete it, the model closes itself up. If you’re working with someone else’s STEP file and it has a dozen features you need to strip back before the geometry is useful to you, Delete Face is how you get there without touching a sketch or a feature tree.
In parametric CAD, removing a feature means finding where it lives in the history, deleting the operation, and then dealing with whatever that breaks downstream. Direct modeling skips all of that. The face exists on the solid. You remove it. Done.
Get the Edge Right the First Time: Editing Blends and Radii
You fillet an edge at 2mm, export, slice, and realize the radius is not exactly right. You want to tweak the radius, not rebuild the fillet from scratch. In PixyCAD, you select the blended edge and change the radius directly. The model updates. No delete, no redo, just an adjustment.
Because PixyCAD’s geometry is built on Parasolid, the blends it produces are mathematically clean. They don’t generate the kind of near-zero-area surface patches or degenerate edges that can show up in lower-quality kernels. When you change a radius, the result is a solid that behaves predictably in a slicer, not one that produces mysterious artifacts at layer boundaries.
Angle It Out: Tapering a Face for Clean Prints
Taper Face applies a draft angle to a face, tilting it relative to a reference direction. Concretely: you lean a wall outward by 2 degrees, or you angle the inside of a pocket so it’s wider at the opening than at the base. You set the angle, choose the pivot reference, and the face rotates to match.
For 3D printing, this is a practical tool with a direct effect on print quality. A vertical wall that overhangs slightly at the top can be the reason a print needs a support structure it otherwise wouldn’t. Angle that wall by a degree or two and the overhang disappears. The part comes off the bed cleanly, no support removal, no cleanup. If you’re printing enclosures or snap-fit housings, adding a few degrees of draft to the interior walls also makes parts easier to extract from the bed and improves how components seat against each other.
If you’re designing something that will eventually go to an injection mold rather than a printer, draft angles are a requirement, not an option. Taper Face handles that too. It’s the same operation, just used at the manufacturing design stage rather than the print optimization stage.
Keep Editing, Stop Rebuilding
Editing a design shouldn’t mean rebuilding it. Move Face, Delete Face, Blend Radius, and Taper Face exist precisely to prevent that: you stay in the geometry, make the change you know needs to happen, and move on. The iteration loop stays short. The gap between “this isn’t quite right” and “ready to slice” shrinks to minutes.
On iPad with Apple Pencil, these tools feel especially direct. Tapping a face to select it and dragging to move it is closer to physically handling the part than anything a mouse-and-menu workflow offers. There’s something about that tactile directness that matches the way makers actually think about geometry. You’re not navigating a software hierarchy. You’re touching the shape and adjusting it.